


|
|
Decorative Jar Using Meal Supplies APRIL 28, 2012 / ADINA BAILEY / 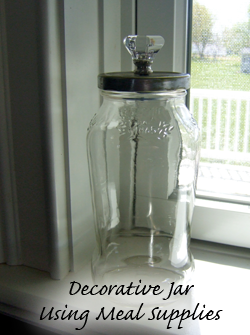
I hesitated sharing this idea because I don't want to give the impression that it's easy for me to whip out these types of projects. In reality, I rarely get to complete even the simplest project, but I really enjoy DIY projects when I have time. These jars appealed to me because I like how they look, I had almost all the necessary supplies on hand, and I could definitely use one to brighten a friend's day. Making this decorative jar takes less than 30 minutes once you've gathered the supplies. Here's my timeline to give you a reasonable perspective of how LONG it took me to finally tackle making one of these cute jars. In the fall of 2011, I was folding a HUGE pile of laundry and I saw this decorative jar project by designer, Bao-Khang Luu, on The Nate Berkus Show. I loved his idea of turning an empty spaghetti sauce jar into a functional and lovely jar. It wasn't until January 2012 that I had time to look for the decorative knob that I needed for the project. The first store I checked did not carry "crystal" knobs. In February, I was in Home Depot and they carried just the knob I had in mind (I love the idea of looking for vintage hardware, but if that was my goal, I realistically was not going to get to make the jar any time soon). While grocery shopping in March, I noticed that Bertolli puts their spaghetti sauce in a glass jar that has a little detailing. I remembered my potential project and purchased the sauce. Finally, this month I decided to serve spaghetti for dinner one night. I was so thrilled the jar was finally empty that I completed the project right after dinner. In the end, it took me about 6 months to get around to making my jar, but I'm so glad I did it. The second one won't take nearly as long. Here's what I started with: 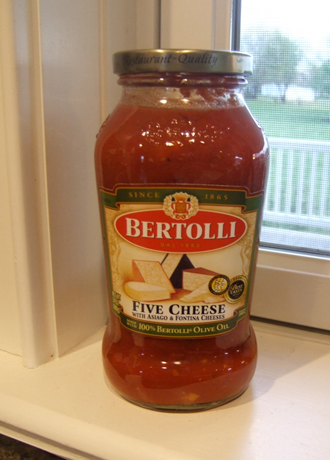
And here's the finished product: 
The different ways you could fill the jar are endless. My jar is now filled with seashells that our family found during a recent beach trip. I look forward to making more for friends and filling them with treats when I'm taking a meal. Here's how I completed my decorative jar: 2. I lightly sanded the jar lid to remove the words. I didn't remove all of the gold paint from the lid because I liked the aged look of having the gold and silver together. I obtained a uniform look by sanding lightly in a circular motion a few times once the words were removed. 3. I'm not a big fan of using a drill, so I used an awl to make a hold in the middle of the jar lid. I estimated how big the hole needed to be for the knob screw to fit through it without being too roomy. 4. Knobs are not made to tighten against a thin object like a lid. Because if this, you must add a little thickness between the screw and knob. The lid of a 2-liter soda bottle works great. Use an awl or drill to also put a hole in the middle of the soda cap. 5. Put the knob on top of the jar lid. From underneath, put the screw first through the top of the soda cap and then through the jar lid hole. The extra thickness the cap provides should allow for a tight fitting knob. 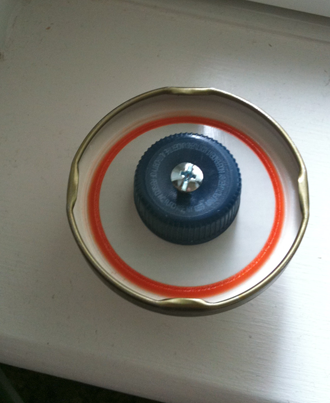
Once the knob is screwed on tightly, you're done. Enjoy! Read other recent articles by Adina Bailey:
 |
Welcome! We're thrilled you stopped by. Our own joys and sorrows have taught us that a well-timed meal delivered by a friend is one of the best gifts imaginable. In this space, we share our favorite recipes to take to friends, meal-taking tips, and other ways to care for those who are dear to you. Helpful Posts
Recent Posts...
|